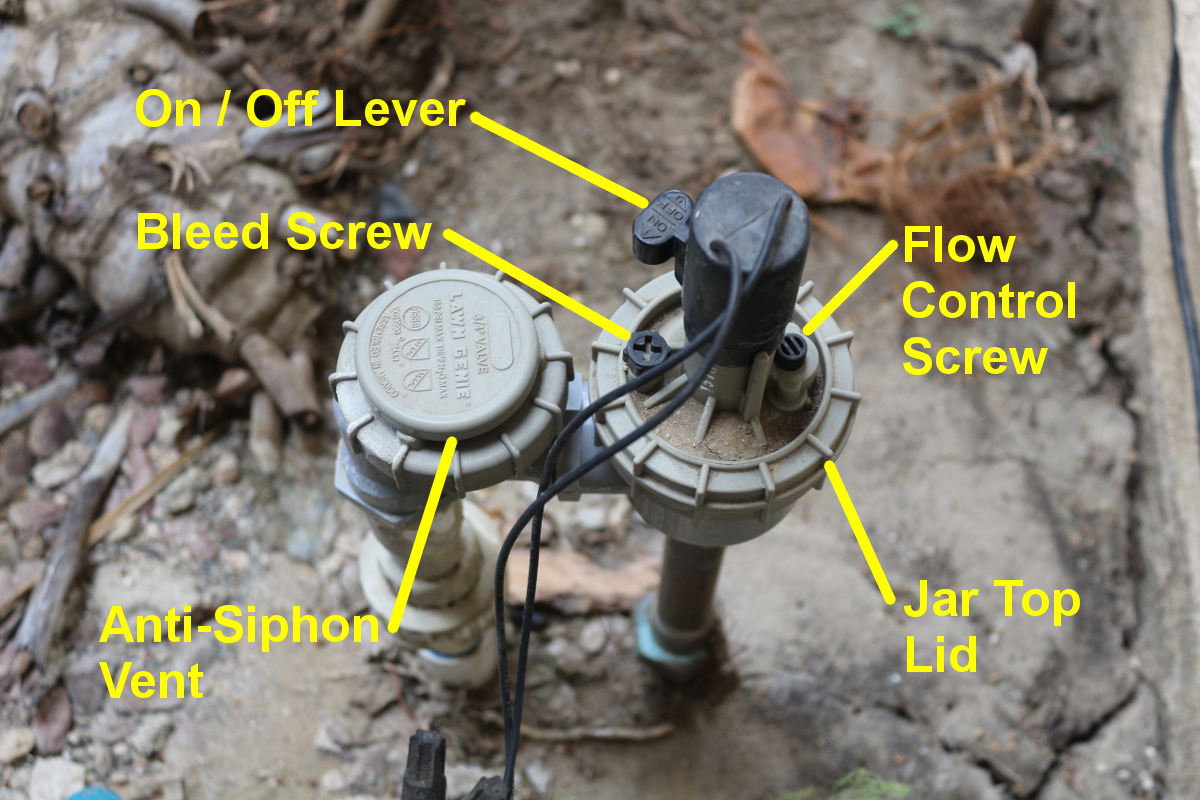
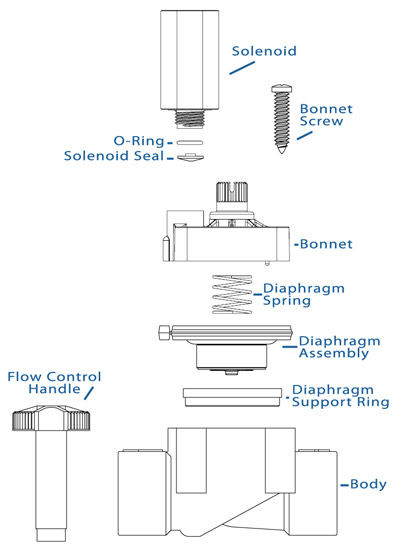
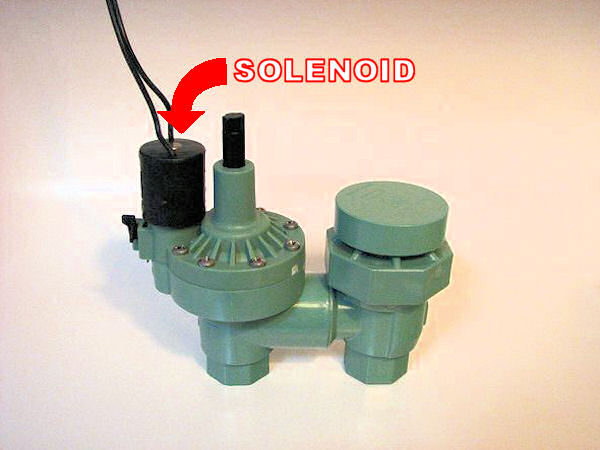
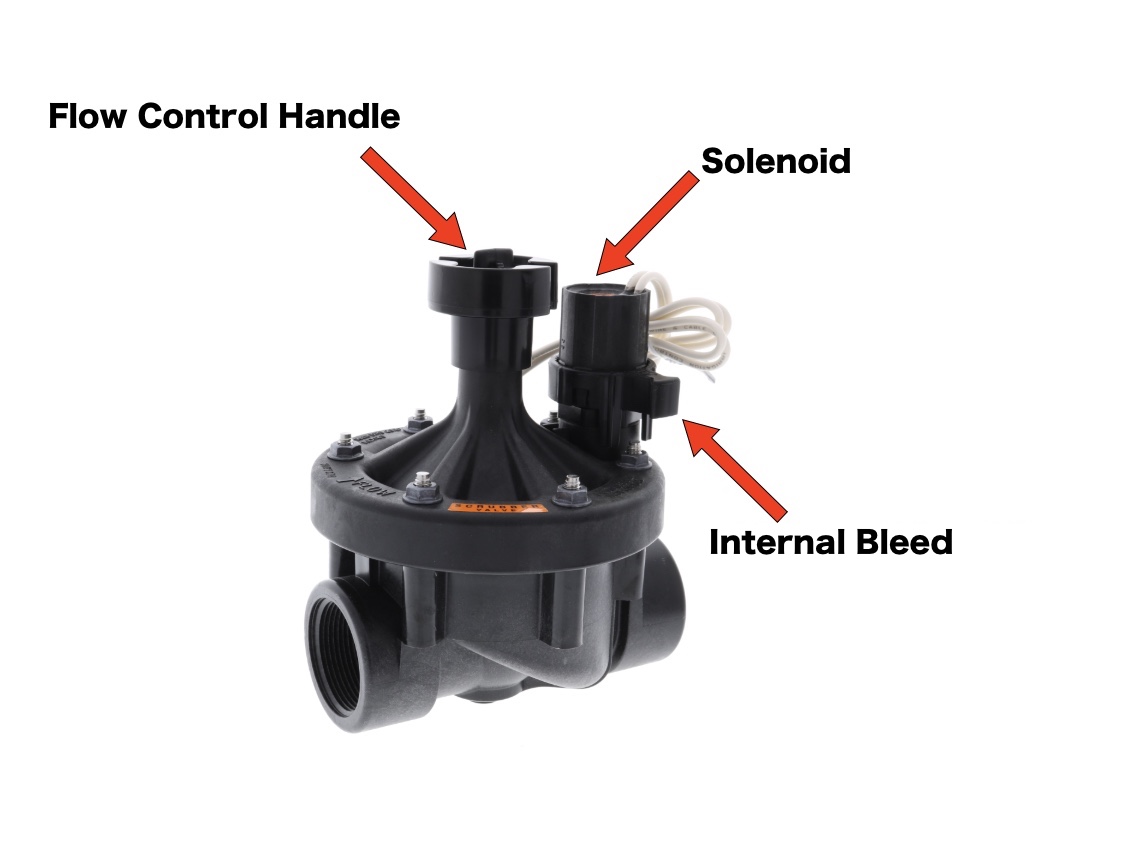
The main parts of sprinkler valve include the diaphragm, solenoid, springs, and gaskets or O-rings. The solenoid, which is an electric cylinder, is crucial to an automatic valve. By receiving electric messages from the sprinkler system controller, the solenoid controls the diaphragm movement.
Basics of Sprinkler Valve
Sprinkler valves turn on and off the sprinklers. They also may be applied for drip irrigation systems. Sometimes they are referred to as irrigation control valves, solenoid valves, or lawn valves. A garden valve is a name mistakenly applied to them. The garden valve is a manual valve to which a garden hose is connected.
These valves come in two basic styles.
Globe or Angle Valve
There are many sizes available for this valve, which is commonly installed underground inside a box or vault. You will need to provide a separate backflow preventer because it does not incorporate one. A Backflow preventer allows water to pass through but prevents it from reversing in the opposite direction. Globe-style valves are typically found on large and commercial sprinkler systems.
Anti-Siphon Valve
They are only available in 3/4-inch and 1-inch sizes. Most homeowners use this style of valve. Anti-siphon valves are designed with a backflow preventer integrated into the valve. This saves a great deal of money since backflow preventers are very expensive. In addition to being installed above ground, the anti-siphon valve must also be at least six inches above the highest sprinkler head.
Using anti-siphon valves requires them to be located at the highest point in your yard and be directly connected to the water supply (this supply line is known as the “mainline”). In order to protect the anti-siphon valves, the mainline pipe that goes to them needs to be buried 18” deep.

Sprinkler Valve Components
This section discusses the different parts of a sprinkler valve. An irrigation sprinkler system is incomplete without a sprinkler valve. Among the main parts of sprinkler valves are the diaphragm, a solenoid, various gaskets, or O-rings. When choosing an irrigation valve, you can choose among many different styles to ensure that your project is successful.

Solenoid
Sprinkler valves include a variety of components that are fundamental to their operation. It is required to install replacement sprinkler solenoids in order to distribute water through the sprinkler heads.
A solenoid is an electric cylinder, which is a vital component of an automatic valve. A solenoid receives electrical messages from a sprinkler controller and moves the diaphragm in response. There is no need for a solenoid on manual irrigation valves. Essentially, a solenoid is a device that opens and closes to allow water to flow through the valve. It is likely that you are experiencing constant water flow or possibly no water flow at all if you have a broken solenoid.
The term solenoid refers to a coil of wire utilized as an electromagnet. In irrigation valves, a solenoid creates a magnetic field as a result of electric current. The solenoid allows air to escape from the valve when it is activated. Depending on the direction the solenoid is activated, pressure is created, and the diaphragm rises and falls. A sprinkler valve cannot function properly without a sprinkler solenoid.
A Defective Solenoid Replacement
When something goes wrong with a solenoid, it is essential that you know how to fix it. Sprinkler valve solenoids can be easily and inexpensively replaced, and then your system can be up and running immediately. Here are some easy steps you can take if you need to replace a solenoid on a valve:
- Turn off the Water Supply: This is crucial. You may find yourself with water running everywhere if you don’t turn off the water. It is always safer to turn off the water first.
- Take off Sprinkler Solenoid: Disconnect old connection wires, as they may be corroded. After cutting your old wires, turn the solenoid counter-clockwise, and pull it off.
- Place the New Solenoid in Place: To do this, put your new valve solenoid in the same spot that your old solenoid occupied. Using a clockwise rotation, you can secure it into place when it’s in the right place.
- Hook-Up Wires: After safely attaching the solenoid into place, you can quickly and easily connect new wires to existing wires. After you attach the wires to the proper places, you’ll be able to use your new solenoid right away.

Diaphragm
Diaphragms are rubber plugs within the valves that enable the water to flow or cease it. A sprinkler valve must have a properly working diaphragm in order to function properly. This component is also known as the valve stopper. It prevents the water from passing through the pipe. Activating the solenoid allows air to enter the valve. The pressure causes the diaphragm to raise and allow water to flow into the outlet.
Sprinkler valves have two pipes attached to them: Inlet and outlet pipes. Inlet pipe connected to the water supply provides water to the sprinkler valve. Its inlet pipe terminates in the middle and is stopped by a device known as a diaphragm. Diaphragms are held in place via rods and springs that open when the solenoid is activated. The solenoid creates pressure in the valve, which opens the diaphragm when it is activated. If the solenoid is activated in either direction, the sprinkler valve’s diaphragm can open and close.
If your diaphragm isn’t working properly, your water will either continuously flow through your pipes or won’t pass through them at all. Yellow grass or a high water bill can be the result of faulty diaphragms. That’s why it’s crucial to have a proper working diaphragm. It ensures that your lawn stays manicured and that your sprinklers function properly.
Wire Spring
A wire spring is behind the diaphragm.
Lid
A jar-top lid is sometimes used on irrigation valves. Screws are sometimes used on other designs to hold the lid in place.
Bleed Screw
The bleed screw is included in many valve designs. Water flow can be manually controlled by tightening or loosening the bleed screw.
Repair Kit
There is usually no need to replace the entire lawn sprinkler valve if one needs to be repaired. Take the valve apart and replace the individual parts. There are many sprinkler valve manufacturers that also make replacement parts, and it’s usually easier to replace the parts than to remove the entire valve.
You may have a broken valve if you are having problems with your sprinklers. When your irrigation valves malfunction, you can check for a number of indicators. You should keep an eye on the following:
- Leaking Water Around the Sprinkler Valve: This is surely one of the easiest ways to tell if the sprinkler valve is faulty. There are a variety of reasons why water is leaking around your valve. It is important to identify where the leak is coming from. Does it originate from the solenoid? Or is it coming from the anti-siphon component of the valve? Then you can identify what parts you need for repair after discovering where your valve is leaking.
- Having Low or No Water Pressure to Sprinkler Heads: If your sprinkler heads are not producing any water pressure, there is a possibility you have a defective valve.
- Inability to Turn On Sprinkler Valve: You can’t turn the sprinkler valve on, either if the electrical wiring going to the valve is damaged or the valve itself is broken. It is possible to test if the problem is with your valve or your wiring by turning the valve on manually.

Valve Operation
Sprinkler valves can either be manually controlled or automatically controlled (automatic valves.)
Manual Valve
The valve can be controlled manually with a handle that is used to turn it on and off.
Remote Valve
A remotely controlled valve is either electric or hydraulically operated with a timer or a signaling device to tell it when to open and close. Most sprinkler control valves today are solenoid valves powered by electricity. An electric solenoid valve runs on 24 volts of alternating current (ac) and is controlled by a timer called an “irrigation controller” or sometimes just “controller”. Anti-siphon valves, globe valves, and angle valves are all available as automatic valves.
Technical Considerations
There are some factors to consider when working with different parts of the sprinkler valve.
Parts Material
Plastic and brass sprinkler valves are both available. Brass is still used for some valves, even though most are plastic. It is a fact that a brass valve will last longer in almost all situations, especially when installed above ground and in direct sunlight. Operationally, both are reliable, especially when used with automatic valves. There are some shreds of evidence that plastic valves wear out quickly and only last for a short time on manual valves. Brass valves are more durable. A cover for plastic valves used above ground may help protect them from the sun, which can damage them over time.
In residential applications and most commercial applications, sprinkler valves are usually plastic, and on heavy-duty sites such as golf courses and municipal pump stations, they are usually metal. Sprinkler valves can be grouped and installed in manifolds, or the valves can be installed individually – valves must always be buried in a plastic irrigation valve box.
Valve materials include two types of plastic. In terms of strength, impact resistance, and pressure rating, glass-reinforced nylon is best. Low-cost PVC valves are still pretty strong, depending on how thick the plastic is. Valve parts like screws or caps are often made from ABS plastic or polyethylene. They are both less strong and are typically used for parts that are not subjected to excessive stress. Valve connections with “solvent welds” (the pipe glues directly into the valve) should be avoided. In the event of a rupture, they are difficult to replace. Solvent weld connections are found only on the cheapest valves.
Parts Compatibility
For single valves, a minimum valve box size of 10 inches round is recommended. Electronically operated sprinkler valves use low voltage 24-volt power generally of 18 gauge for residential use and 14 gauge for commercial applications. Each valve requires a 24v power wire and a “common” wire that is shared between each valve.
Almost all valves and controllers that operate from 24 volts are compatible. Valve controllers that are battery or solar-powered are the most common exception to this rule. When we say they are battery powered, we mean that they are not plugged into a power source other than the battery. Despite the fact that some controllers have batteries to prevent program loss during a power outage, they are not “battery operated”.
Thus, you can usually buy a brand “X” valve controller, and it will work well with a brand “Y” controller. There is even a possibility of mixing two or more brand valves together if that appeals to you. Valves and controllers in the irrigation system all come from different kinds of brands. There will typically be a warning on the packaging if the valve is not “universal” or compatible.
Flow Control
Whenever possible, it is highly recommended to use a valve model that allows for manual flow adjustment if you are planning to use automatic valves. Flow controls shouldn’t be confused with manual on/off switches. In addition to the manual switch, the flow control is also a separate handle (sometimes a screw).

In the event of an emergency, the flow control bypasses the automatic valve function allowing the valve to be manually closed. It is even more advantageous because the valve can also be ‘throttled’, meaning the water flow rate can be adjusted as desired. When installing your sprinkler system or later managing it, the ability to adjust the flow rate is very useful. Most inexpensive valves do not have this flow control feature. However, it’s well worth the cost to have this feature.
When the valve sticks open, you can manually close it using the manual flow control. A valve that is stuck open won’t shut down when the manual on/off switch is used. The most common problem with valves is that they don’t automatically close, which means you may have to use the flow control to force close a stuck valve someday.
Your flows may be at the low end of the valve’s operating range, so throttling down the flow control may be needed to make the valve close more quickly and reliably. The lack of flow control may cause many problems in this circumstance, and the valve may have to be replaced.
When the flow control is partially closed, the valve will close faster, which is generally not what you want to do, but sometimes it is necessary. When using an automatic system, the next valve usually opens before the previous one is completely closed. Due to the loss of pressure caused by running two-valve circuits at the same time, the first valve may never fully close. To remedy this, a flow control may be used.
Buy Equipment or Ask for a Service
By using Linquip RFQ Service, you can expect to receive quotations from various suppliers across multiple industries and regions.
Click Here to Request a Quotation From Suppliers and Service Providers
Read More o Linquip
- Parts of Shower Valve
- Parts of Check Valve
- Parts of Gate Valve
- Sprinkler Valve Manufacturers
- Ball Valve Manufacturers
- Air release valve Manufacturers
- Pinch Valve Manufacturers
- Angle Valve Manufacturers
- Best Check Valve for Sump Pump: 9 of the Best Models
- 6 Parts of Butterfly Valve + Function: A complete guide!
- Backflow Valve Installation, Costs and Maintenance in 2022
- How to Install a Thermostatic Mixing Valve? (Costs and Maintenance in 2022)
- How to Install a Water Pressure Reducing Valve? (Costs and Maintenance in 2022)
- Check Valve Installation Costs and Maintenance in 2022
- The 10 Best Water Shut off Valves of 2022
- What is Drain Valve? Working Principle, Types & Applications
- What are Coaxial Valves? Working Principles and Type
- What is Isolation Valve? Working Principle & Types
- Backwater Valves: Working Principles & Types


