In this post, we will be looking at how to install check valves (costs and maintenance in 2023). To begin, let’s briefly examine check valves, their applications, and their working basis. The check valves are valves that allow fluids to flow in one direction but close themselves automatically to prevent backflow (reverse flow). Check valves are commonly used in a wide variety of locations. We will focus our discussion on the installation of check valves and their costs, as well as their maintenance.
If you are looking for information on check valves, then you will find it all at Linquip. You can always rely on our experts to help you get suitable check valves for your needs. You might like to read Linquip’s article, “What is a Check Valve? Working Principle and Function,” if you would like to get a basic idea of these industrial devices.
Have you ever dealt with them before? Discover the valve you’re looking for among Linquip’s selection of Check Valve Products. Do you require any particular type of service for your check valve? Have you ever found yourself in a situation where you were in need of an installation or repair and maintenance guide for a check valve? Linquip provides free access to all Check Valve Service Providers through our platform. As an added benefit, if you are interested in finding check valve prices, you can do so by submitting a request/inquiry to all Check Valve Suppliers and Companies for free via the Linquip platform.
A Brief Introduction to Check Valves
The purpose of a check valve is to restrict fluid flow in one direction. There are two ports, one to receive the media and one to output the media. One-way valves or non-return valves are commonly referred to as such since they only allow media flow in one direction. The key function of a check valve is to prevent backflow in a system.
To function, they require a differential pressure. To open the valves, they require more pressure on the input side than on the output side. Whenever there is excess pressure on the outlet side (or too little pressure on the input side), the valve will close. However, the valve type determines how the valve closes. Unlike other valves, they don’t require a handle, lever, actuator, or human to operate properly.
Most commonly, they are used where backflow could potentially cause problems. Non-return valves are inexpensive, effective, and easy to use when trying to resolve an issue. It is possible for backflow to contribute to contamination of upstream media if it is contaminated. In a sewer line, for example, a non-return valve ensures that waste can leave but not re-enter the system.
They are also used if media flows should only be allowed in one direction in order to prevent damage to equipment upstream. An example would be a reverse osmosis filter that is unable to pass water in both directions, and a one-way valve is added downstream to prevent this. Check valves come in a variety of sizes, designs, and materials to suit any application.
Check valves are classified according to their structure. The types of check valves include lift check valves, swing check valves, and butterfly check valves. The type of lift check valve can be classified as vertical or straight through. A swing check valve can be a single, double or multi valve. Butterfly check valves come in butterfly single valve and butterfly double valve varieties. The following check valves are distinguished by threaded, flanged, wafer, and welded connections.

For more detailed information about check valves, please click here.
A Check Valve Installation Cost
| Item | Cost |
| Device cost | $35 to $600 |
| Labor cost | $100 to $400 |
| Average cost | $135 to $1000 |
Almost always, the cost plays a role in the selection of a product. Check valves are no exception. Check valves come in several types, each with a different price. When selecting check valves, compromises are often made since no single valve type can meet all the conditions of a given system. One type of valve may have a faster closing speed than the other, but it may have a greater head loss than another, making it undesirable. A customer should review these factors when calculating costs:
- Has an increased head loss been noticed across the valve caused a high cost of energy consumption?
- Is the valve capable of protecting the system and its equipment? It is necessary to take into account system downtime, replacement components or entire valves, labor costs, loss of revenue, etc.
- How competitive is the price, and how are the prices from different suppliers compared based on similar valve types and similar performance?
A typical homeowner spends between $135 and $1,000 depending on how big and expensive the system is. Depending on the device, it costs anywhere from $35 to $600, and labor can range from $100 to $400. In most cases, a back water or check valve will cost you between $70 and $250.
Installation of Check Valve
Various types of check valves require different installation procedures. The considerations for installing different types of check valves are described concisely in this section.
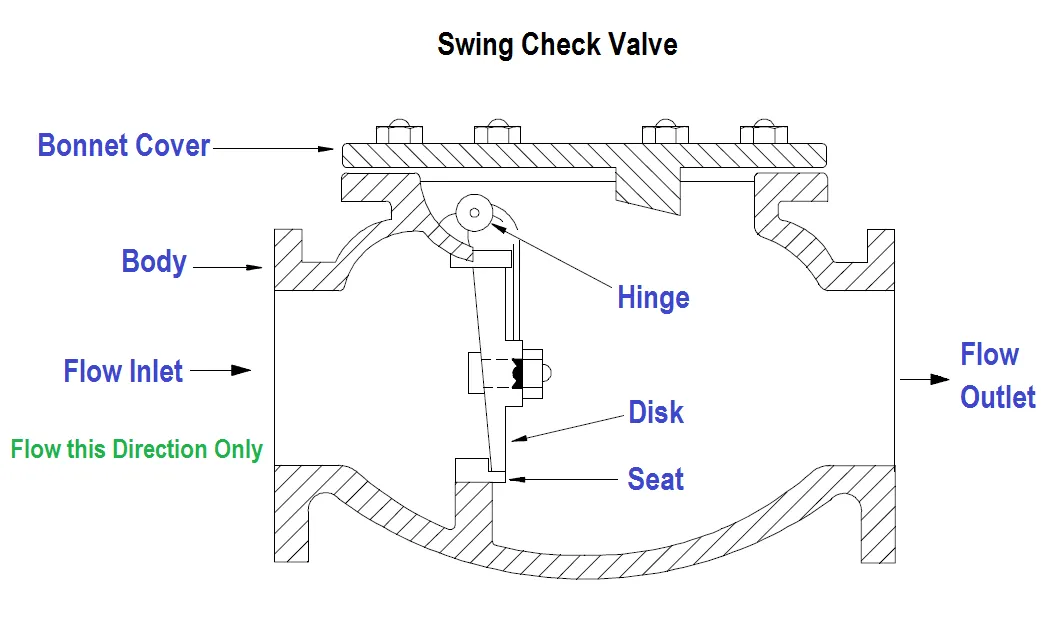
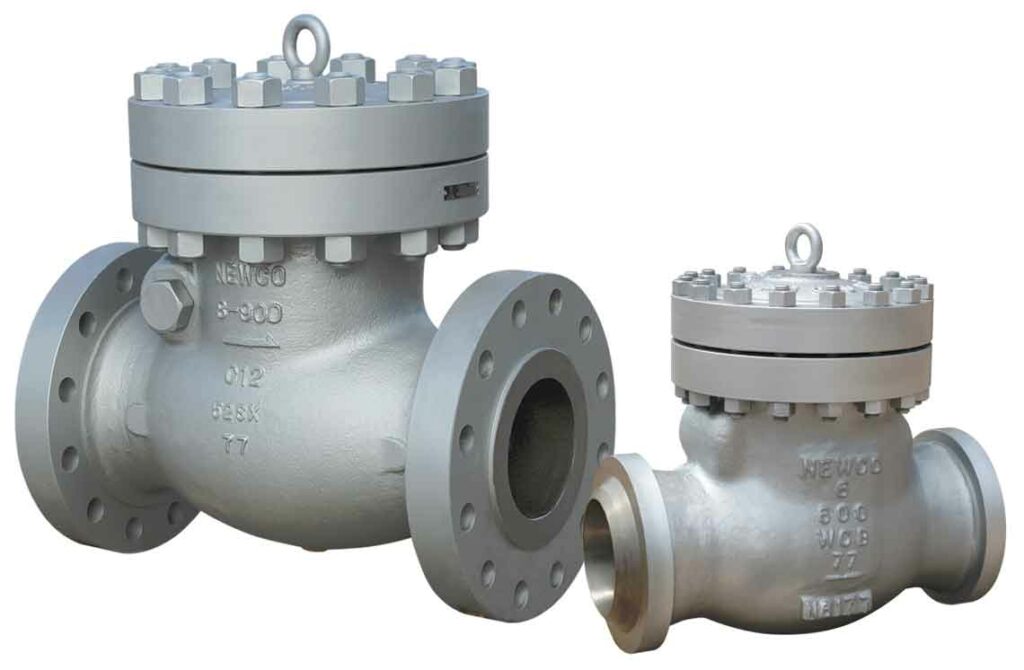
Swing Check Valve
The swing check valve has a disc-shaped valve that rotates around the axis of the seat passage. Its streamlined channel makes it more resistant than a lift non-return check valve, so it is suitable for low flow rates and large diameters with infrequent changes. However, it cannot handle pulsating flows, and its sealing performance falls short of that of lift check valves.
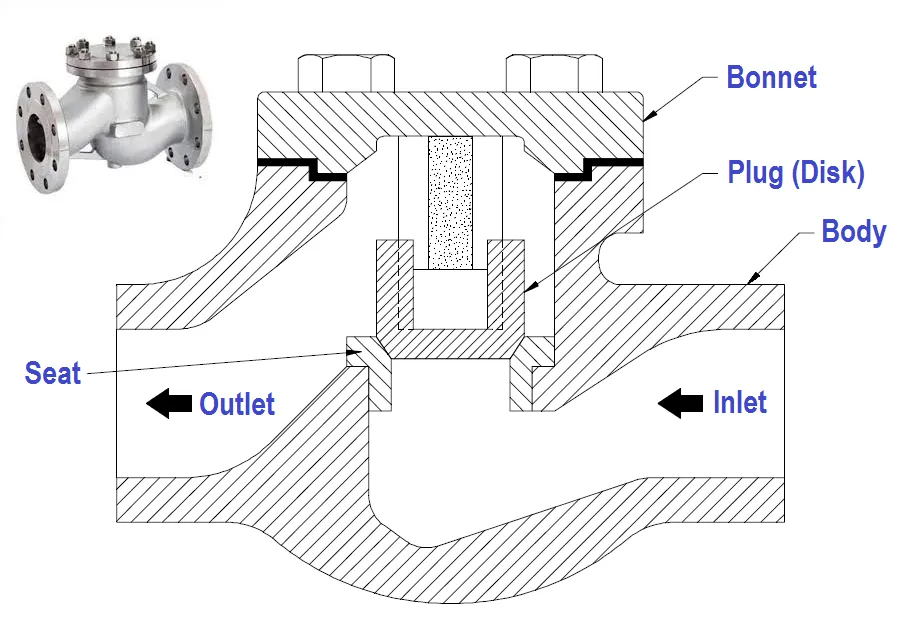
Lift Check Valve
In order to install the lift non-return check valve on horizontal pipes, it has a vertical centerline that slides along the body of the valve. Check valves with small diameters and high pressure can be fitted with balls. Lift check valves have the same valve body shape as globe valves, thus having a higher fluid resistance coefficient. The valve body is identical to those found in globe valves, as is its structure. By thrusting the valve in the downstream direction, the valve opens, and by landing on the valve seat when the flow is stopped, the valve prevents reverse flow. The direction of its inlet and outlet passages is parallel to that of its valve seat passage. Vertical lift check valves have outlet and inlet channels that are parallel to the valve seat channel, and their resistance is less than that of straight-through check valves.
Disc Check Valve
Simple in structure, the disc non-return check valve rotates around its pin in the valve seat. The valve is only suitable for horizontal pipes and is poorly sealed.
Pipeline Check Valve
An inline check valve slides along the centerline of the body of the valve. This type of valve is lightweight, small, and easy to process. On the other hand, its fluid resistance coefficient is larger compared to swing check valves.
Installation Position of Check Valve
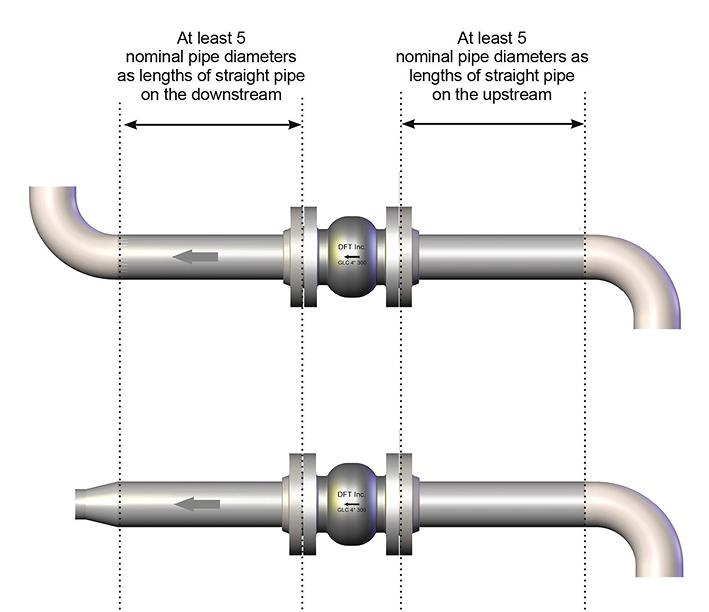
Now, let’s talk about where to install the check valve and how to do that? How do check valves installed behind and in front of pumps differ? What are the applications for the check valves in front of pumps? A check valve is usually used in conjunction with another valve. In the case of using check valves together with other valves, where should they be installed?
A check valve functions automatically. In order to operate, the valve relies on the pressure generated by the flowing medium through the pipeline to push the valve disc closed and open. The check valve disc closes when the medium stops flowing so that it prevents the medium from flowing back through the pipeline, which plays a significant role in ensuring pipeline safety.
In order for the water pump to function normally, the check valve ensures the flow direction of water inside the unit. As a result, the check valve can be installed either before or after the water pump.
One of these valves is located at the end of the vertical suction pipe in front of the water pump and is referred to as the bottom valve. By doing this, the pump is filled with primary water without having to pump primary water. Pumps cannot pump water when there is no water in them and no suction pipe in front of the pump, requiring the pump to be filled with water to operate properly. It is also known as a negative pressure method, as it requires installation above the liquid level.
The other method is behind a water pump. Using this method is practical when the liquid level is above the level of the water pump. It is unnecessary to close the outlet valve of the water pump when starting and stopping the water pump, especially when using the main pipe water pump system.
In order to perform maintenance, the check valve must be positioned at the outlet of the pump and before the outlet control valve. In general, the soft connection (shock absorber) is the first outlet, followed by the check valve and then by the block valve.
- Scenario 1: Install the check valve first, followed by the gate valve or butterfly valve. Because it protects the check valve, particularly if there are parallel pumps. During a pump start-stop scenario with one pump not starting, its outlet valve closed, and the other pump starting, the gate valve or butterfly valve takes the impact force. It is possible to close the inlet and outlet valve isolation systems for repair if the check valve fails.
- Scenario 2: Connect a gate valve or butterfly valve into the flow path before the check valve. In addition to protecting butterfly valves or gate valves, the check valve can also absorb the impact force.
Since the non-return check valve is frequently opened and closed, its internal parts and sealing parts are susceptible to damage. For easier repair and to prevent the whole system from being shut down if the check valve fails, the installation will take place before the outlet gate valve or butterfly valve.
Check Valve Maintenance
There are several common problems with check valves, including noise, water hammer, vibration, reverse flow, sticking, leakage, and component wear and damage. A correct specifying check valve for an application and media is essential to prevent issues. Inadequate specifications are most often responsible for reverse flow and water hammer. Check valves can fail to close fast enough, causing reverse flow, and pressure surges, causing shock waves within the media, can result in water hammer. Both problems can be solved by using a fast-closing check valve.
A faulty check valve will allow backflow. There are three potential causes for this: sticking, leakage, and slowly closing. In the absence of a filter, dirt or debris can get trapped between the disc and body, preventing it from closing. Wear or corrosion of the material on the disc or seat can cause the disc or seat to tear, resulting in an improper seal and allowing backflow to occur. A valve that closes too slowly may allow a small amount of backflow to enter before it has established a proper seal. Ensure your designs can take advantage of gravity, or your spring must be fast enough to close the valve quickly.
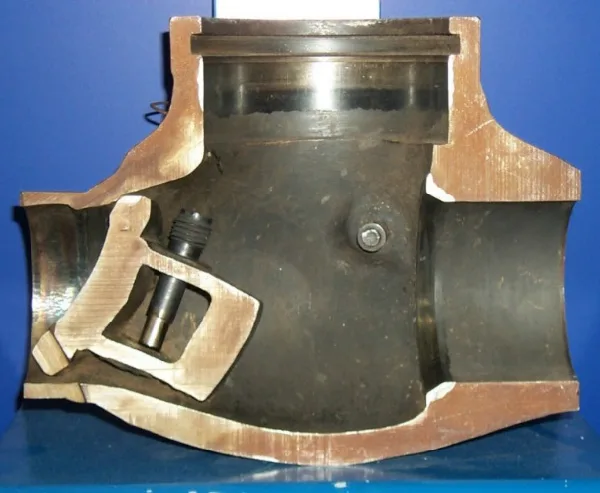
Check valve maintenance should be performed in accordance with the manufacturer’s instructions, as with any hydro-mechanical equipment. Various types of check valves require varying levels of maintenance. However, regardless of the type of valve, making sure the valve disc is free to move completely will ensure a long and trouble-free lifespan for the device. This usually involves periodically inspecting the hinge pin, bushes, and disc to ensure that no excessive wear has taken place or sedimentation has built up.
Is the Check Valve Placed Before or After a Valve?
It is generally assumed that the first outlet of a pump is the soft connection (shock absorber), followed by the check valve and then the block valve. This has the advantage of protecting the check valve, especially when there are parallel pumps.
What Is the Best Distance Between a Check Valve and a Pump?
In the case of submersible pumps, the first check valve must be installed directly on the discharge of the pump or at a maximum of one pipeline length (20 feet) above the pump.
Download PDF for How to Install Check Valves
By clicking on the download link provided below, you can download this article in PDF format.
Buy Equipment or Ask for a Service
By using Linquip RFQ Service, you can expect to receive quotations from various suppliers across multiple industries and regions.
Click Here to Request a Quotation From Suppliers and Service Providers
Read More In Linquip
- Gate Valve Installation Costs and Maintenance (Clear Guide)
- Globe Valve Installation Costs (Clear Guide) + PDF
- Air Release Valve Installation Costs (Ultimate Guide) + PDF
- Angle Valve Installation Costs: Practical Factors
- Solenoid Valve Installation Costs: Main Factors + PDF
- Ball Valve Installation Costs & Repair (Ultimate Guide)
- Best Check Valve for Sump Pump: 9 of the Best Models
- A Complete Tutorial To Learn About Different Types Of Check Valves
- Top Check Valve Manufacturers in the USA
- Different Parts of Check Valve with Diagram
- Backflow Preventer vs Check Valve: What’s the Difference?
- Everything You Need To Know About Check Valve Function
- Lift Check Valve: learn the basics, get the most out of it!



Hello, This is Very Nice Article, Detailed And Very Useful Information On Valve And Pump. Keep Sharing Contents Like This, Thank You So Much…
Your kind words are much appreciated, Nikhil! It was a pleasure having you visit us.